The Web Connector is the QuickBooks tool that enables Connex to integrate with your QuickBooks.
If you are a QuickBooks Online user, skip this step. These steps apply to QuickBooks Desktop users only.
Pair the Web Connector
The Web Connector is the QuickBooks tool that enables Connex to integrate with your QuickBooks (see also: What is the QuickBooks Web Connector?). The next steps for setting up will be to download a Connex-generated QWC pairing file, apply it to the Web Connector, and finally run the Web Connector for the first time to establish the connection.
⚠️ You will be working in both the Connex account (your web browser) and QuickBooks during the pairing process.
In this article:
- Add a new Channel (step 1)
- Choose Sync Direction (step 2)
- Log into QuickBooks (Step 3)
- Download the Pairing File (step 4)
- Pair QuickBooks (step 5)
- Configure Web Connector (step 6)
- Pairing the Web Connector video walk through
QuickBooks Required Access
To complete the following steps, you must be logged into QuickBooks as the Admin user and have temporarily set QuickBooks to single-user mode.
Add new Channel (step 1)
In this first step, click add channel to start setting up your new connection. After this, enter the require fields to move to step 2.
Choose Sync Direction (step 2)
In this step (in the Connex account), we'll set the direction in which data should flow with QuickBooks. There are three choices, depending on the specific integration you are connecting: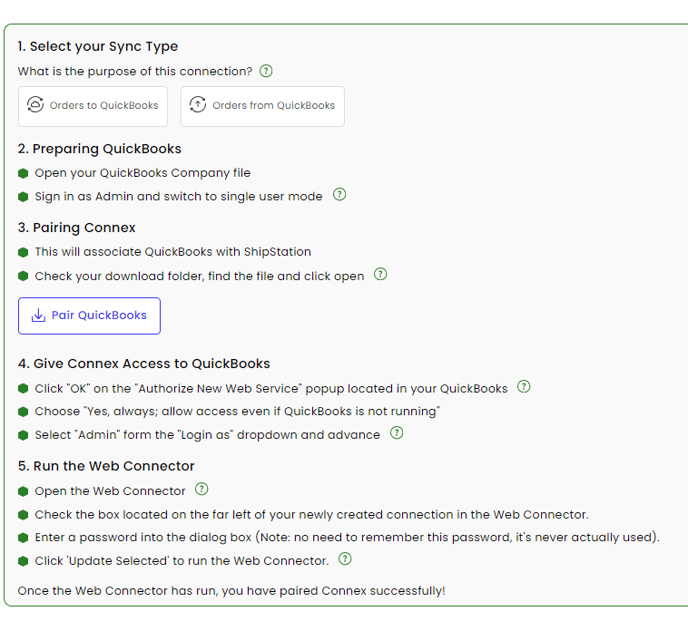
1. Sync orders to QuickBooks from the chosen integration (in this example, ShipStation)
- This is the default behavior and selected by default. This is what you need if you wish to sync your sales into QuickBooks
- One you click Orders to QB, fill up the next page with required fields to set up the account.

2. Sync inventory from QuickBooks to [Shopify] and sync orders
- This behavior enables the Connex inventory updates features and syncs sales into QuickBooks.
Note
Not available with all integrations. To see which integrations support inventory syncing, please click here.
3. Sync orders from QuickBooks to [ShipStation]
- This behavior enables the syncing of transactions created within QuickBooks and sends them to the Shipping platform/solution.
- We refer to this as a two-way sync.
Note
Not available with all integrations. To see which integrations support order syncing FROM QuickBooks, please click here.
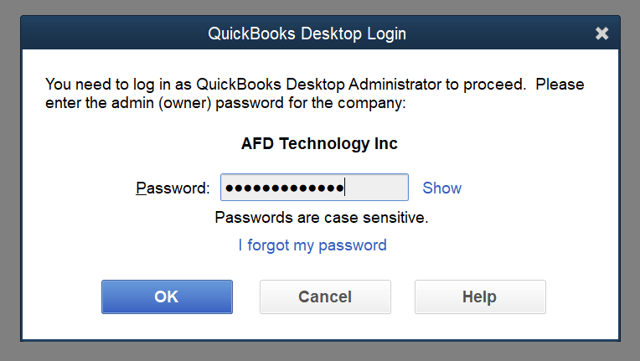
Log into QuickBooks (step 3)
Open the QuickBooks company file.
Next, log into QuickBooks as admin in Single User Mode.
💡 If your QuickBooks company file is located on a local server (LAN) or hosted remotely through a hosting company, you must perform these steps on the server.
Download Pairing File (step 4)
On your Connex Dashboard , click settings > Select Channel > Connex Settings > Pair Computer > click Pair QuickBooks.
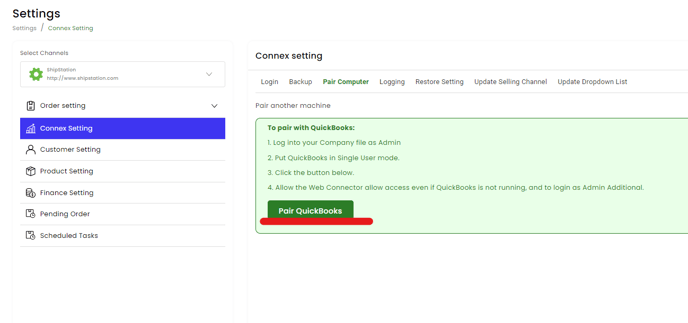
Pair QuickBooks (step 5)
1. Once the QWC files appears in your web browser downloads, double-click to execute. This will likewise open the QuickBooks Web Connector. Otherwise, you can open the Web Connector from within QuickBooks by clicking File > Update Web Services OR File > Update Web Service > Manage Web Apps.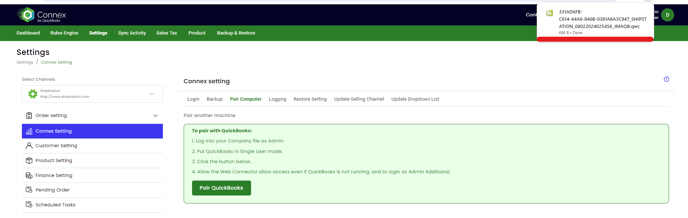
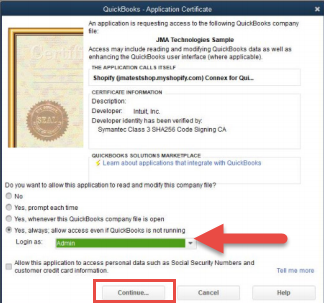
2. A QuickBooks authorization certificate will appear - click OK.
3. Next, continue the authorization process by clicking Yes where appropriate. Finally, select the "Yes, always..." option and choose the "Login as" to the Admin user. Click Continue..., then click Done
.
Configure Web Connector (step 5)
Open the Web Connector by going to File -> App Management -> Update Web Services.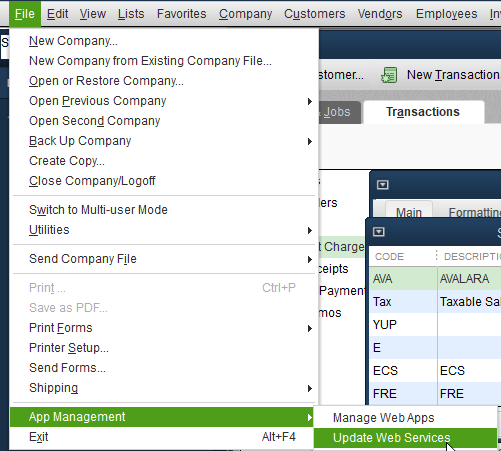
- In the Web Connector, place a check mark next to the Connex Application on the left-hand side. This selects the integration.
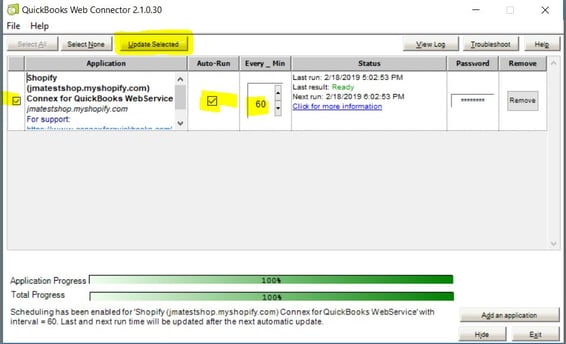
2. Next, in the Password field, enter an arbitrary password - it can be anything you like. Make sure to save it.
3. Finally, click Update Selected. This runs the selected integration. The goal here is two fold: 1) This tests the integration to ensure QuickBooks is talking to Connex; 2) is shares some vital information to Connex so the remainder of the set up can be complete.
The final steps, configuring your integration, will be completed entirely within Connex (in your web browser).
Switch to Multi-User Mode
Just in case, you can now return your QuickBooks to multi-use mode, too (File > Switch to Multi-user Mode).
Getting Started with Connex Desktop: Pair the Web Connector (Video)