- Connex for QuickBooks User Guide
- Getting Started with Connex for QuickBooks
-
Connex for QuickBooks User Guide
- Getting Started with Connex for QuickBooks
- Remote Desktop (RDP)
- Customers Matching
- Inventory Site
- Inventory Sync
- Multicurrency
- Orders
- Price Levels
- Products
- Refunds
- Sales Tax
- Sales Orders
- Unit of Measure
- Web Connector
- Getting Started with Rules
- Rules Engine Common Rules
- FAQ
- Deposit Match
- Cost of Goods Sold
- Troubleshooting
-
Connex Inventory Planner
-
Frequently Asked Questions
-
General Troubleshooting Guide
- Deposit Match Troubleshooting
- QuickBooks Desktop Error Messages
- Inventory Troubleshooting
- Incorrect Orders Troubleshooting
- Sales Tax Troubleshooting
- Web Connector Troubleshooting
- QuickBooks Online Error Messages
- Match Deposit Tool Troubleshooting
- Product Matching Troubleshooting
- Customer Matching Troubleshooting
- Rules Engine
- Orders from QuickBooks
- Payments Troubleshooting
- Missing Orders Troubleshooting
- Company File
-
Connex for QuickBooks Integrations Guide
-
Rules Engine Guide
Getting Started with Connex for QuickBooks: Add a New Integration
How to add a connection to your Connex account
Add a new integration steps
1. Click Add New Channels" from Dashboard Page, Choose from the list the integration you wish to setup. Notice that once selected, a handy instructions guide will appear on screen with integration-specific instructions.

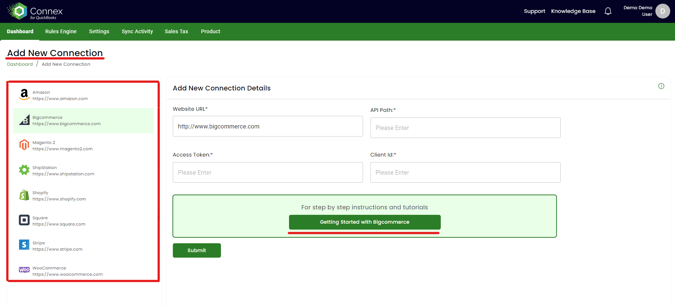
2. Click read instructions to launch the integration-specific guide.
Now that Connex is paired with the chosen integration, the next step is to pair Connex with QuickBooks via the Web Connector.
🔷 Next: Pair the Web Connector (Step 3)